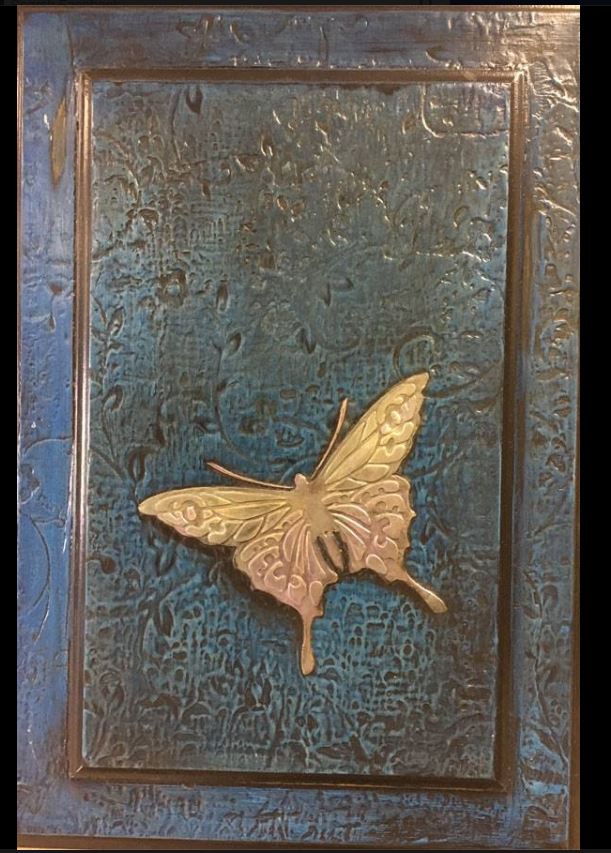
The Purple Painted Lady loves this effect using Textura Paste from Wood Icing and their beautiful glazes. Visit our on-line shop for all of your needs to do this project.

Textura Paste is a water-based acrylic product, which has the consistency of peanut butter. NOTE that there are no nuts in this product!)
This may be spread with a spatula or trowel then impressions and designs are made with any number of objects or tools. Use foam rubber stamps, mesh, lace, and numerous other materials. Another option is to trowel Textura Paste through a stencil for a raised design.
You may also apply our Textura Paste through a stencil directly onto bare or unfinished wood. Once it has been stained it is hard to tell the difference of real carved wood and a Wood Icing design.
The Textura Paste should be allowed to dry overnight to a hard crispy surface, then sand to remove the high spots and clean up the surface. Stain, glaze or paint. Once the project is complete, apply two to three coats of protective polyurethane for the final finish. You may use oil-based or a water based polyurethane.
Clean up with soap and water .
Material List:
Textura (what you use to create the texture on this piece)
DIRECTIONS:
1. Use Mineral Spirits to clean the surface you plan on painting. Get a rag and lightly moisten it and then wipe the surface. Imagine that the Mineral Spirits is nail polish remover. Flip the bottle over a couple of time and moisten the rag. You do NOT want it dripping wet! Once done wiping down the surface…
2. Use clean water and a fresh rag and wipe the whole piece down again. Let dry
3. Textura Wood Icing needs something to grip to. Chalk Paint® is perfect for this! Shake your paint well and then paint a base of Chalk Paint®. (two coats) Let it dry and cure for at least 12 hours.
4. Apply a liberal coating of the Textura Paste by Wood Icing. (spread it over the surface as if you are icing a cake. Fairly liberal since you want enough to take a pattern or a relief but NOT so thick that it will take days to set)
4. Use your Textura Wood Icing. Mix it up and then spread it on with the offset. Maybe an 1/8th inch thick or more. Always place the lid on top of it when there will be long periods of time between use. Mist the Textura Wood Icing slightly with a little water.
5. Next, using a piece of lace, dip it into water and ring it out. You want the lace to be moist but not dripping wet! (pick up a piece at your local fabric store and make sure it is big enough to cover your hole project’s surface …or use partial pieces and patch work to get a cooler look ) ….. pressing the fabric with an embroidered lace pattern into the Textura Paste while the Textura is still moist, then, gently peel the lace off ….leaving the relief without pulling the Textura off. Allow the Textura to fully dry!
** NOTE: if you have drag marks it could be an indication of pulling the lace too straight up. Keep it low and peel it back. It could ALSO indicate that the Textura paste is too wet. If that is the case, pat the surface with a paper towel while the lace is still in place, then try peeling it off. Remove lace immediately and allow that layer of Textura to dry completely.
6. Sand lightly over that layer to remove any areas that puckered up or pulled up like a stalagmite or if you have lumps or bumps that are not pleasing to the eye.
7. Stain the Textura with Indigo Blue glaze. (apply it with either a brush or rag and then wipe off excess)
8. Let that dry and apply a barrier coat of our Poly-Acrylic Top coat – sold on our shopping cart. Use a brush and apply a uniform, thin coat. Do not let it pool in the crevices. Allow that to dry completely.
9. Then go over the top of that with Black Licorice Glaze. (again, apply it with either a brush or rag and then wipe off excess)
10. Next, lay a stencil down of your choice and apply the Textura Paste to create a raised effect. Wait for it to completely dry!
11. Use our Modern Masters Pale Gold paint to brush over the raised stencil only. (in this example- the butterfly) Let dry.
12. Then, apply Black Licorice Glaze for the shading around the raised stencil. Allow to dry.
13. Finish with three coats of Poly-Acrylic. Allow each application to fully dry in between applications.
BUY PRODUCT FROM …..THE PURPLE PAINTED LADY®:
First- if you have a local stockist- go visit them and build a relationship with them. Go to them with your questions and project issues. BUT- if you do not have a local stockist- we invite you to try our customer service!
XO
The Purple Painted Lady® ~ the serial no. is 86/641,416 with the US Trademark Office
