I received a question from a painter out there in DIY land regarding using wax as a top coat. Basically, if you are on a budget…is using the wax necessary. Here is the question and then my response:
QUESTION:
Hello. I am planning to buy some chalk paint for my very first furniture project. The pieces I am painting are a high gloss laminate finish. I guess that doesn’t really mater… my question is actually on the wax. Is waxing mandatory? Is it like a sealer? The furniture will be barely used as it will be in my spare room, but I want to be sure about how significant the wax is to the process. I am into a more modern look, so there will not be any distressing of the paint just a straight cover in graphite. I don’t want them to come out looking dull, but I also do not want to spend more money if it is not vital. Please advise and happy happy holidays.
-Jamie
The Purple Painted Lady’s RESPONSE:
Hi Jamie,
Thanks for your note. The response to your question is a bit confusing since I would normally respond to that with both a “YES” and a “NO.”
I am going to explain that “Yes and NO” response below- but just like I end this post- I want you to know that as for me personally and in my store…..I always wax the pieces that I paint. .
Chalk Paint™ Decorative Paint by Annie Sloan has a flat matte finish by itself…meaning how it looks when there is no wax on top of it. The Chalk Paint™ does cure over time and becomes very strong without a protective finish. This cure time is about a few weeks. At my shop in upstate New York, someone dropped a sample pot of Old White Chalk Paint™ on the sidewalk outside in July of 2012. We have tried to power wash the Chalk Paint™ off and it is still there!
To read and see a photo about the sidewalk accident that I feel is a great representation about the durability of chalk paint, click HERE.
Now with that said, I feel that the soft wax as a top coat however is also very important.
First, from just an aesthetic perspective- the wax will give your piece a very slight luster. That luster is NOT a lot if applied and NOT buffed, but it does have a slight sheen versus the flat Chalk Paint™ by itself. And, based on your email- I believe you stated that you did not want a flat finish. So, if you want your piece to be shiny or have a lot of sheen, then you need to apply the wax and buff it.

Chalk Paint™ by nature, has a super flat finish straight out of the quart….so basically once the paint dries and cures- the finish will be similar to that of a chalk board. If you drag your fingers across it – you will see a slight trail. Also oils from fingers, damp dusting when cleaning, or anything that could come into contact potentially could leave a mark.
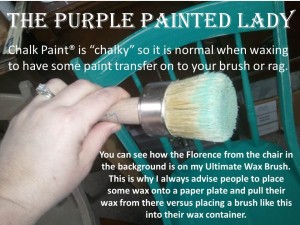
The wax is important to protect the paint – like polyurethane does when using Latex. In regards to water protection, especially in kitchens and bathrooms- having a top coat is important but that does not mean you can place a wet shower towel on your painted piece and leave it there overnight. But in general, for basic protection, you need something made from wax and / or oil….ie……oil and water don’t mix. (and not to be too odd or crude here- but that is why when in your home a new toilet is installed- the toilet is set on the foundation but with a very THICK wax ring placed as a seal between the plumbing and the porcelain toilet base)
I have tested many waxes. I always share with people that since I own my shop- I could have chosen to carry any product available on the market. I will only associate my personal name, my store name and my reputation with what I feel is the very best to offer. Thus- that is why I carry Annie Sloan’s products! And on a side note….I was also the very first Chalk Paint™ stockist in New York state.
Getting back to the testing of other waxes: I have found that the water based waxes just do not work as well at all and they come off when you wipe them with a cloth!
Petroleum wax, also known as paraffin wax, is a by-product of the petrochemical industry…it is a residual from another manufacturing process. Annie Sloan’s Wax upcycles that left over material from other manufacturing processes … in that a petroleum by-product is used in her wax versus of it being disposed. As Annie states, “It is a good and economical base.”
Annie’s wax is made up of various components though, such as all natural bees wax (which comes from bees!) It is added to make it soft.
Then there is also carnauba wax which is from a plant. Any wax will be very water repellent, but that is a primary characteristic of carnauba wax. Carnauba wax can also become as hard as concrete by itself so the strength of it is amazing!
Chalk Paint™ because of its particular porous structure allows the wax to soak in- like quality skin lotion will on your body. This is why Chalk Paint™ and Annie Sloan waxes marry each other perfectly- they were created to do so and no other mixing of products will produce the same results. The Chalk Paint™ cures and then, the wax absorbed cures and you end up with a beautiful and durable piece of transformed furniture.
However, (and here is the part where I explain the “NO” in my original response above)…..there is a technique called the Modern Look where you do not use wax as a top coat.
Basically – after you have applied a few coats of paint …often with the last coat being applied a bit thinned with water, you then polish the paint with some 220 or 400 grit sand paper. When you do this, it is similar to burnishing Venetian plaster. You are polishing the paint – making the surface very smooth, making the surface have a bit of sheen since you are knocking off any surface tension and compacting the paint making it harder. (now keep in mind, if you do this process, if you were to want to apply wax afterward- the wax may not be absorbed as well into the paint since the paint is not as porous.)
You stated that you want to use the color Graphite. Obviously- like a car- dark colors can show imperfections much easier than light colors. So- what I would suggest is that if you want to try this “Modern Technique” approach- that you practice on a smaller separate piece and determine if you like the results first.
One suggestion regarding the cost being an issue, is to not purchase the wax when you buy the paint. You do immediately need to wax your piece if you know there will be minimal touching of it. That way- you can save up a bit and then purchase the wax. Keep in mind though, the wax is sold here on my site at $24.95. No matter who you purchase paint though- a second order or trip to the store equates to additional shipping cost or gas in your car being used. So, just keep that in mind since in the end…your attempt to save on money may end up costing you additional $8.
To read a previous post I wrote that focuses on the durability of wax, click HERE.
Again, coming full circle from where I started my response to you….as for me personally and in my store…..I always wax my pieces that I sell.
If you have a stockist near by, you should check out their workshop offerings and consider taking one. Reading information on-line is helpful, but nothing compares to the hands on class room. Either way, I hope that my response helped you and that when you decide to purchase paint and possibly wax – if you need to make a trek to do so – that you kindly consider purchasing it through me. That is what supports me to be here to answer questions like yours. Not to mention- I offer the lowest flat rate shipping and the very best customer service. (that is just my personal opinion though!)
Happy New Year!!!!!
Trish ~ The Purple Painted Lady