A LITTLE Q & A on PURE WHITE Chalk Paint™

A LITTLE Q & A: PURE WHITE Chalk Paint™ question.

A very dear customer of mine asked…..Someone brought me some pieces to paint and said they want them WHITE. I have used old white several times, but I’m just ordering “pure white”. Do you have any suggestions? They’ve asked for a white, white piece lightly distressed. That’s my goal.

The Purple Painted Lady’s response:
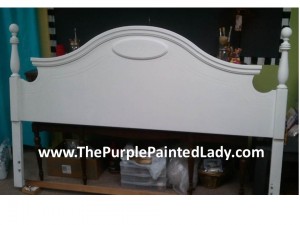
(First- I apologize for the lousy photo. It was taken with my cell phone.)

You will want to use Pure White Chalk Paint™ Decorative Paint by Annie Sloan- like you ordered.

I did a king size headboard at Christmas for a woman and it came out great. Something I did not do ….and that I should have- was shellac’d the furniture using Zinsser prior to painting with the Pure White Chalk Paint™. I would have used less paint!!!

Now keep in mind- when painting a piece WHITE…and wanting that bright white..even after shellac…an average of 2 coats will be needed. So, when you compare the cost of paint to shellac = it is worth the extra step for the shellac. (and if you can spray the shellac it will not add much time to your process) This example I share was based on that in December I painted a maple wood bed. Depending on what you are painting over, some colors that have less pigment – like Pure White will require what I shared above. This is not always needed- but there are examples that will and it is important to know that.

Questions that I would have back for my customer were:

What is the state of the furniture now?
Does the customer understand- that whatever the base is- will be what you see slightly once distressed? Make sure that is ok and I don’t know about you- but I always write up a very detailed contract for custom jobs!

Lastly, for those of you who paint for others….If you can have the customer find “inspiration” photos on line that you can reference in understanding what their “end vision” is- it is extremely helpful and I recommend incorporating those photos in the contract! Otherwise- and often- people have a difficult time articulating their thoughts and you do not realize they wanted “B” until you have invested time and materials creating “A.”

To explain my comment further above where I state that the shellac can help in using less paint …I mean in the sense that many people will write me and say- I am getting bleeding through the paint from the wood underneath. Then they will share that they are on the 4th coat of paint!!!! WHOA! This is where I say, “back away from the paint brush!” Sometimes- it doesn’t matter how many coats of paint you applied- there is an issue beneath that the paint cannot prevent. (that sometimes happens) So, as soon as you start to see wood tannins bleeding or stain seeping through- shellac is TYPICALLY going to help you. Shellac is an ideal sealer…where polyurethane (I am about to answer a question I received from The Country Nook in Rochester, NY now. Check out their Facebook page by the way.) …Polyurethane is best to protect from abrasion…not sealing. Shellac is used both as a furniture finish (and a very good one) and sealer (both for furniture and covering spots that you think might bleed through paint). Don’t buy more shellac than you have to use in a short time. It will spoil in the can and if you open a can of spoiled shellac, it will smell to high heaven . One of the reasons I love the spray …or the quart sizes. I recommend shellac..Zinsser Shellac since that is what I use and have been happy with the results. As for polyurethane- it gives an incredibly hard finish…. some polys can take up to at least 8 hours to dry, thus gathering all of the bugs and dust that will be available during that time. Again shellacs are great for sealing.

Do I Need To Sand Off Chipping Paint?

Just received a great question from Joy Hall. (Hi Joy!!!)

Joy wrote me ~ I am going to start my first piece with Chalk Paint® Decorative Paint by Annie Sloan which has been painted with an olive green paint. The paint is somewhat peeling on places. Should I sand the paint off or is OK to just paint over it? Thanks for your help.

My response was~ You never need to sand for Chalk Paint™ to adhere- HOWEVER, if you have loose paint- you should sand to remove what is easily flaking off. (I often use the analogy that you never would want to build a house on quick sand) Chalk Paint® is incredible- but it is not a miracle. SO a solid foundation…or surface for this matter is important. That means dusting/cleaning your piece prior to painting (unless you want it to have extra texture), removing the rust or making it inert (unless you want the rust to bleed through) and removing loose chipped – peeling paint. And having texture or rust bleed through is not a bad thing at all- if you are going for that type of look!

However, if you do scuff up and sand chipping paint to remove it- afterward – make sure that the surface is smooth. Meaning not pitted (like a hole) from where the paint chipped off otherwise your new top coat of paint color will take on the profile of the piece and if it is pitted or has pockets where paint has peeled- that topography will show through the fresh paint. Again- Chalk Paint® is amazing- and sometimes you can apply it a little thicker to compensate for variations in the surface- but keep in mind- if you apply very thick you run the risk of it “Crackling” a bit during the drying process.

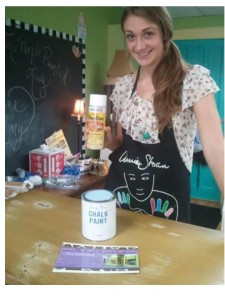
Another thing I would like to share – is that you may also want to shellac the whole surface once done spot sanding. IN FACT…9 times out of 10 – you probably should shellac after doing a partial sanding like shown in the image below of Adrienne who works at the shop with me.

We sanded the top of the dresser that had deep scratches and since both stained wood and bare wood were exposed – we used the shellac to create a barrier so that the paint went on without shadowing from the different surfaces shown. NOTE that when using shellac…it is important to shellac the whole surface and not just spot treat. Shellac is also important to use when you have used wood filler…shellac after the wood filler is dry to allow the paint to be applied without any variation from the different surfaces. Wood filler will take the paint differently then your finished piece will and you do not want to have to apply extra coats to cover any visual differences.

Another good question written in from Ashley Steenhoven was, “Do you shellac the whole thing or just where you put the filler?”

Again, my response is to never spot treat with shellac. Always do the whole side of whatever you are spraying as so you do not run the risk of either a surface line from just where the shellac perimeter is…or risk having discoloration due to just applying it in a small spot. Better to be safe than sorry. SO- as for the example in my photo- we would spray the whole top …but were careful when doing so not to over spray any other area of the dresser that we did not need to spray, meaning the sides or front. Again, since we only sanded the top, we did not spray the sides or front since it not necessary. Keep it simple and don’t make extra work for yourself- or use product that is not necessary since both equate to wasted time and wasted money. When I sprayed the top using the Zinsser Shellac can, I aimed the can from the center of the dresser top facing out to the sides as so to not get spray on the sides or front of the dresser. Does that make sense? (I probably should take a photo of me doing this- so you can see an image!!!!) And remember when working with spray shellac to always read the safety instructions on how to properly use any product.

We have MOVED OUT of The Shops on West Ridge June 2022

The Purple Painted Lady is located at 2620 State Route 31 Palmyra NY 14522.  Come and visit us any time between 10 – 5 Monday through Saturday.  And if those hours are not convenient for you- please call us and we can make arrangements to be available at a time that is.

Annie Sloan’s New Video- Up Close & Personal

Annie Sloan is the artist behind the famous and trademarked Chalk Paint™ Decorative Paint! She is a REAL person! See her, hear her- know that she creates GREEN – environmentally safe Chalk Paint™ with rich, luxurious colors that are durable to paint the outside of your home with!

Please view her video and leave a note saying The Purple Painted Lady in NY sent you. Then leave me a message on my Facebook page saying you did it- and on August 7th one of you will be selected to receive a container of gorgeous gilding wax!

Brilliant…just absolutely brilliant Annie is!

Now please go watch her video and be inspired!

Denice Clark Won the Whimsical Wednseday GIVE A WAY!

Happy Wednesday!

Thank you to my friend Garden Whimsies by Mary. Mary has a passion for repurposing thrift store “treasures” into unique, one of a kind garden art. They are the added “bling” every garden deserves. No matter what your garden style is …from formal, eclectic to cottage, a garden whimsy is the perfect garden accessory.

Her designs include: Garden totems, centerpieces, garden stakes, plate flowers, wind chimes and home accessories.

Mary’s whimsies were recently featured in the Outdoor Living 2012 issue of Valley Homes & Style Magazine. Mary shares tips for creating your own whimsies via her Facebook page, website and blog.

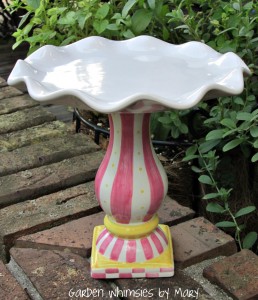
Mary and I partnered on introducing some of our Facebook friends to one another! Colleen Lang from my page was the lucky lady who was chosen to receive this beautiful whimsical pedestal stand!

It would be perfect for holding cupcakes, jewelry, candles or pretty soaps in the powder room. All you need to do are three simple things: 1) show her some LOVE by visiting her page and LIKING it. 2) Leave a note on her page saying “The Purple Painted Lady sent me”. 3) Then, leave a note on my Facebook as a comment to this posting stating “You LOVE Garden Whimsies by Mary”.

And The Purple Painted Lady in turn gave a way a free custom house plaque! Denise Clark from Garden Whimsies by Mary‘s page won it!!!

Congratulations to you both!