NEW WORKSHOP – “Get Your French On!” Ooh La La!

Due to opening our Second Location in Greece NY in August, Workshops are very light for the summer—HOWEVER…..stay tuned for our fall line up. Because… they are going to knock your socks off! For instance:

September 13, 2012 (Thursday)- GET YOUR FRENCH ON! French Typography Painting Class

Starting at 11am
COST $80

“GET YOUR FRENCH ON” Workshop ~ French Typography Painting Class

This class is focused on using Chalk Paint™ Decorative Paint by Annie Sloan.

You bring in a painted piece of furniture (painted with Chalk Paint™ Decorative Paint by Annie Sloan) Piece should have a fairly flat surface where detailing will be done. (piece must be approved prior by The Purple Painted Lady) The Purple Painted Lady will supply the tools and materials to create something like the images below (but perhaps on a smaller scale in regards to scope.) The Purple Painted Lady will share her tips & tricks, like how she accommodates for curves on the perimeter of the drawers, which brushes are best, how to optimize the placement and size of decorative image.

Workshop cost is $80 and it covers studio time, materials and instruction.

A large selection of French Designs and Typography provided to choose from- similar in size so maintain balance of project scope among all in the class.. For a small fee- image can be customized. Detailing will be completed in one color and a sample pot of the Chalk Paint™ Decorative Paint by Annie Sloan you selected will be provided as a gift for you to take home.

Again, this class is focused on using Chalk Paint™ Decorative Paint by Annie Sloan.

CLASS SIZE: This class capacity would be for a maximum of 4 people and a minimum of 2- exceptions may be made based on my schedule- however, this would not set a precedent.

DURATION: 4 hours (could go a little longer dependent on your ability) Additional studio time can be purchased for work not completed in the duration of the class- based on the approval & schedule of The Purple Painted Lady.

COST: Pricing for the 4 hour workshop is $80.00 per person- paid in full at time of reservation. Pricing includes all materials- including a sample pot of Chalk Paint™ to take home and instruction to transform your piece.

If interested in inquiring – please email me at takuntzATrochester.rr.com (please use the @ sign where I have AT in that email address) and NOTE “GET YOUR FRENCH ON” in the subject.

The Purple Painted Lady Wants To Be Your One Source For Decorative Paint Products!

The Purple Painted Lady wants to be your one source for Decorative Paint Products!

I am very excited to announce a new product that is taking the country by storm when it comes to cutting edge decorative design transforming furniture and cabinetry. Please allow me to introduce you to Wood Icing™.

You must own a retail space or are a wood cabinetry shop to attend! So, if you are looking to broaden your suite of Decorative Paint Products- then this is a workshop not to miss!

Learn 12 techniques over two days!


See invite for details and examples!

Contact The Purple Painted Lady if interested in the October 8 & 9 workshop being held in the beautiful Finger Lakes Region of Upstate NY during our spectacular fall foliage & wine season.

Need help coordinating lodging? No problem! My girlfriend owns a local B&B and I can manage lodging & evening entertainment.
There is limited seating ~ so don’t wait to register.
Hope to hear from you- email or phone with questions or to make reservations.


Thanks so much!
Tricia Migliore Kuntz
The Purple Painted Lady

I Am Grateful For You!

Hi everyone out there in internetland!

Funny how we can become friends and get to know each other through my Facebook page and email. I am very grateful for those of you who have LIKED my Facebook Page and follow my daily posts about Chalk Paint™ Decorative Paints by Annie Sloan- the best in the world! Or my artists spotlights of those who will be at The Purple Painted Lady Barn Sale & Junk Jubilee on September 22nd happening in Palmyra, New York!

One of the best parts about what I do is getting to meet so many of you. I am happy that I am here to help- especially those of you who reach out needing help ASAP! The most rewarding part however, is receiving photos and comments from customers showcasing what they did with the products they purchased through The Purple Painted Lady or with the advice or suggestions I have provided to them.

Here is a great example of using Chalk Paint™ by Annie Sloan outside. Susanne did a great job making her front entrance warm and inviting! I was really flattered by the note she left with this photo post:

“TOTALLY inspired by The Purple Painted Lady!! Arles front door (still needs another coat) Provence on rocking chairs. Flower pots in a special mix of a bunch of AS paints (mostly Old Violet). Can’t thank Trish enough for her fabulous creative eye.”

You are so welcome Susanne!


Below is a photo taken by Gloria, who was a bit intimidated regarding painting furniture initially. But I think she has proven to herself – that she has talent! She has completed a buffet, some decorative whimsical chairs and working on another project- probably as I type this. If I can share this- I believe her pieces have a MacKenzie Childs flair to them!

Next week we will have a location where all of you will be able to post pieces you have done with a brief description. It will have a voting option too- so we can celebrate those who have the most LIKES with free giveaways! I hope that sounds like fun to you!!!!

Well, it is a little after midnight and I still have “work” to do. But again, a sincere sweet thank you to all of you – I live my dream every day because of you and I AM GRATEFUL FOR YOU!

When it is HOT or COLD- I recommend painting with your Chalk Paint® inside! (wax too)

Do you get as excited as I do when I see that big brown UPS truck pull into my driveway? Or perhaps it is a white truck if having something delivered via FedX. Especially when waiting for your Chalk Paint® order to arrive.

Keep in mind- any time you use a product- be it paint, hairspray, perfume…temperature and humidity can impact its performance. When it is COLD across North America – I would caution you to NOT paint in your garage or outside.

(in fact- let me stress that again- DO NOT STORE PAINT / LACQUER PRODUCTS ANYWHERE THERE IS POTENTIAL THEY CAN FREEZE!)And the same can be expressed for painting in the heat. It causes the paint to dryer faster than it already does. So, be aware of this and always paint and store products in reasonable temperatures, no matter what product line you are using.
UPS Truck deliver

This is important also when it comes to paint deliveries. As soon as you get home- if a box was left for you outside on a porch or garage…get it in to room temperatures ASAP. Don’t panic!

Give your product a good 24 hours to get acclimated to room temperatures before opening or shaking. This applies to BOTH heat and cold.

When it is hot- it is primarily the wax you want to re-solidify. If it is extremely soft- IT IS OKAY! But let it get to room temperature on its own.

And when it is sold- let the paint and wax- get to room temperature again- on its own!

Patience is a virtue here and allow the product to truly get to room temperature on its own. For when it is extremely hot- something to consider is that one of the components of Annie’s wax and Miss Mustard Seed’s wax is bee’s wax. Bee’s wax has a relatively LOW melting point range of 144 to 147 °F. I have never done a study- but the back of the big brown UPS trucks are not air conditioned and I am sure they can get pretty warm! So, when it is hot- do not try to expedite the process by placing it in the freezer. Or- for when we get back to the winter months- do not try to expedite the process by heating it up somehow. Be patient and allow it to get to room temperature naturally!

(this information also applies also in the opposite extreme- meaning – hot temperatures.)
When it comes to painting in extreme hot temperatures – ….it causes the water in the paint to evaporate too quickly. This can lead to a “crackle” like finish on parts of your piece. That could be great, if you want your piece to have a crackle finish…but terrible, if that is not the end result you were looking for. You want to paint and wax your pieces in ambient temperature … that range could be between 55 – 85 degrees. Although at the lowest and highest end of that range- you still need to be cautious.

PAINT IN REASONABLE TEMPERATURES:

Also, as you may be aware- Chalk Paint® is a bit thicker in comparison to some paints. You do not want your paint to become thicker in the quart due to it drying or water evaporating. If for some reason – this does happen. Add a small amount of water and incorporate totally to determine if more is needed. You can always add more water, but if you add too much- you are stuck. : ) So keep this in mind when painting and the phone rings. Cover your paint before getting lost in a 30 minute phone conversation.

I like to share with my female customers in my NY store, the analogy of if you left hairspray in your car over night in the winter when we can have temperatures in the teen’s here, you would not expect it to perform. Paint and wax are no exception.

Make sure that your furniture that you are going to paint is at room temperature also. A little heater placed in your garage and running only when you are out there – is not adequate at all!

CRACKLING OF CHALK PAINT® DUE TO HEAT:

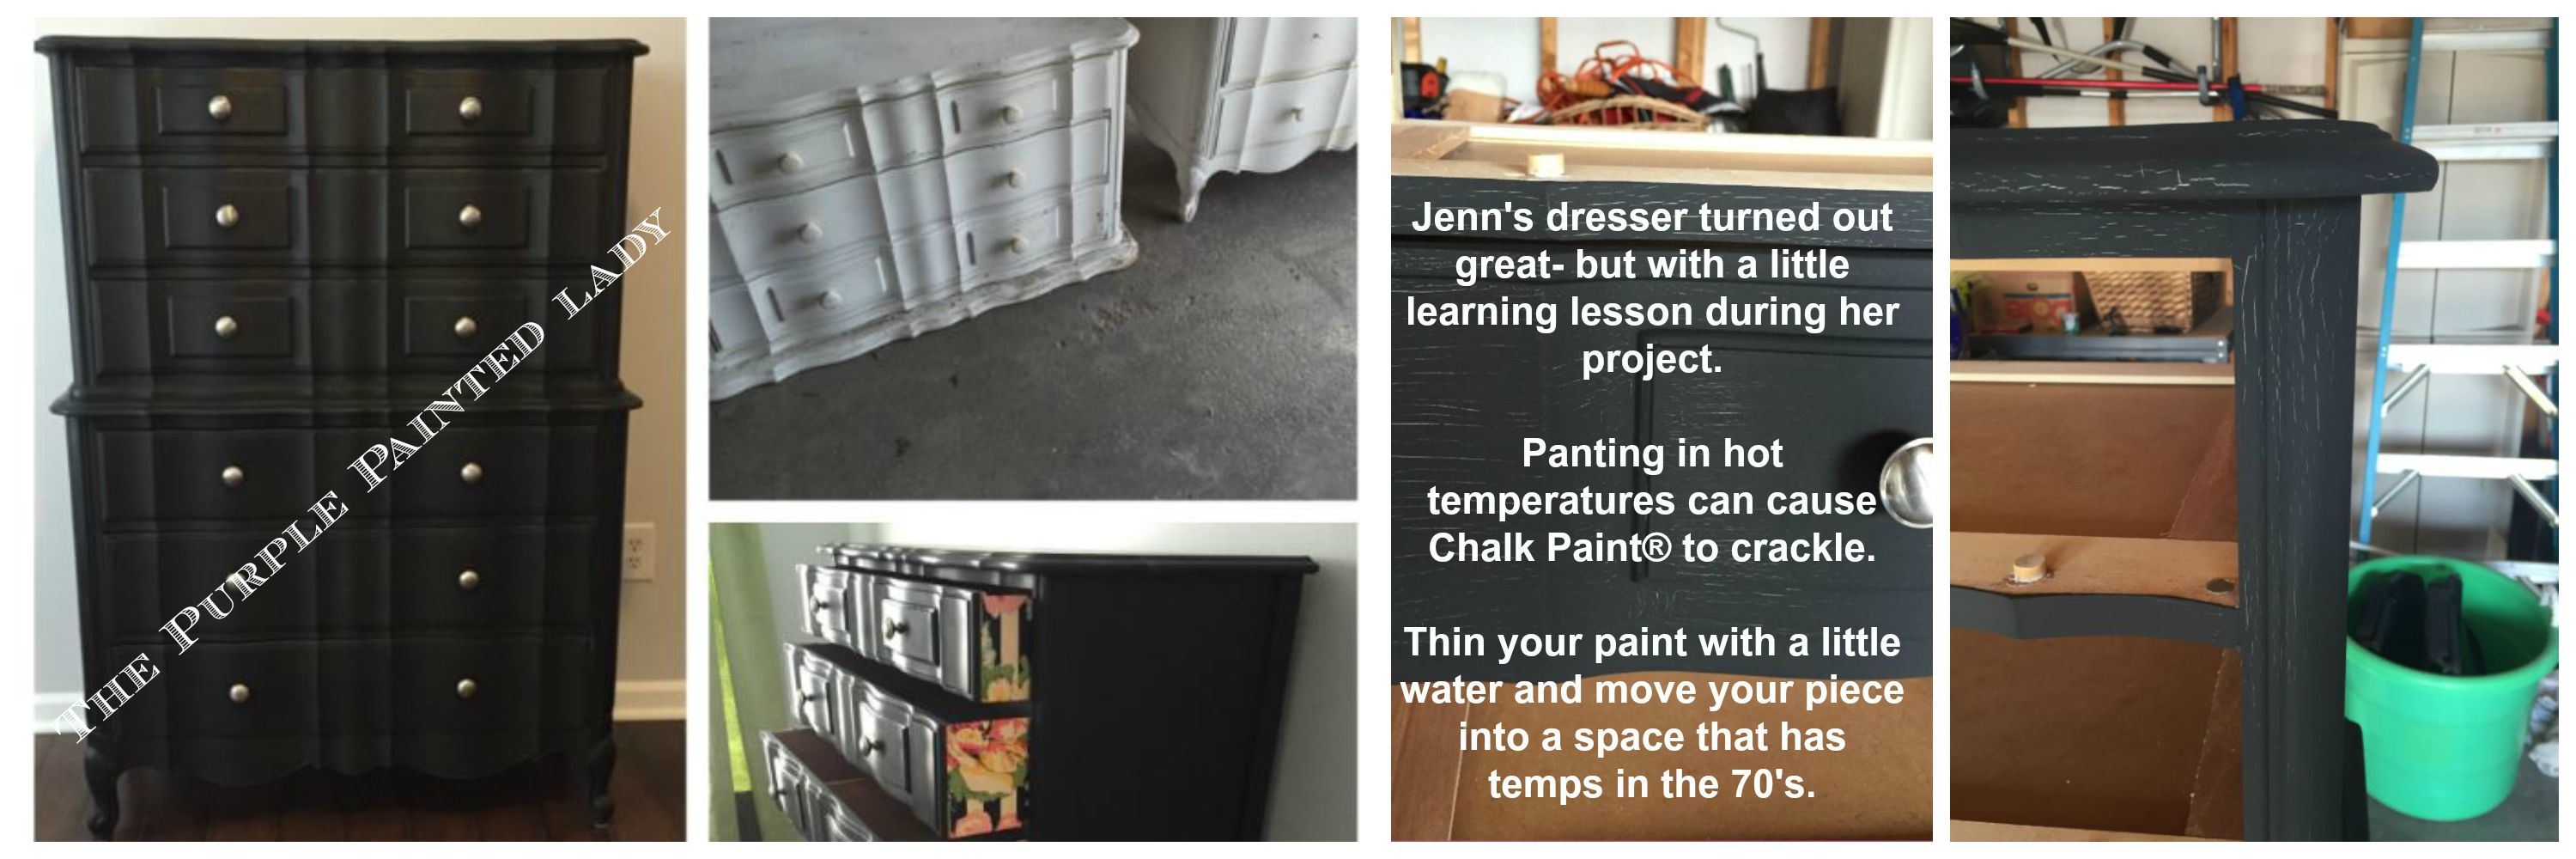
True story…..it was September here in western NY and still quite hot out for many of us.

We had a customer, Jenn  (who I go to church with I might add) – and she had an issue with crackle happening while painting with Graphite. See how the cracks happen all along her brush strokes…and note she was painting in an open garage.


The Purple Painted Lady rackling paint due to heat

The Purple Painted Lady Jenn Pero Graphite dresser HOT

As soon as I saw her photo – I reminded her that when using CHALK PAINT, the high temperatures and lack of moisture in the air can play into a successful outcome.

So I advised her to move the piece into the house and add a little water (or distilled water) to some of her paint. I assured her – this would remedy her issue- and it did! I love what she did to the side of the drawers! Annie Sloan would be proud of you, Jenn!


The Purple Painted Lady Jenn Pero Crackled Chalk Paint annie Sloan heat


Now an additional reason that your Chalk Paint® could crackle- is how you cleaned your piece (or how you did NOT clean it.)

I think you will find depending on who you speak to- there will be a different response on which product is best for cleaning.  Before I share how what I prefer to clean- the most important thing to know- is that after cleaning- wipe your piece down with a fresh water rinse.  It is important that there is no residual cleaning agent left or it can repel the paint or cause it to crackle.

As for us- we prefer to use either odorless Mineral Spirits or Krud Kutter.  Again- remember to do a fresh water rinse when it is finished.

WHEN WAXING:

When waxing a piece of furniture- please do that in an area that the temperature will allow the wax to dry and harden. Speaking of wax- if you are a customer who has paint and wax delivered, please bring in your package and give it ample time to acclimate to a reasonable temperature. Those UPS and FedX delivery people can share with you- that do not have air conditioning in the summer in the back of their trucks! Nor do they heat the back of the trucks. So, do not open your wax till it has solidified if it just came off that 100 degree or more hot box. Or- allow your wax to soften naturally if coming in from the cold! Bee’s wax has a very low melting point- so let your wax “regroup” itself before you judge it for the first time. You want your wax to be the consistency of Crisco. It it is too thin or thick – it won’t work as well!!! : )

I recently received this message via my business Facebook page from Marci Jo about Chalk Paint® freezing:

HELP! my five cans if chalk paint were inadvertently left in my bag porch while moving stuff around in my dining room. They froze last evening!!!!!!!! Will they be ok? I’m sure not….. I’m devastated….

My response to her was this:

Your paint SHOULD be ok…. The Chalk Paint® should be able to go through a couple freeze cycles- but there is NO guarantee on this and you want to avoid this if all possible. I suggest that you bring them inside- which I am sure you did already. Give them a few days to get back to room temperature on their own. (meaning do not try to heat them up to expedite the process) Then shake the can and open. Chalk Paint® can with stand some temperature abuse, but not repeated and there is no guarantee on performance long term when it is not kept or used at conditions required.

Thanks all and I hope you are staying warm!!!!!

“I Applied The Wax Days Ago And It Is Still Tacky”

“I applied the wax days ago and it is still tacky”

Does this sound like you? If it does, guess what? Unless you live in a rain forest where the humidity is 100%, I would bet you dollars to donuts- that you applied too much wax!

Now what?

Well, most of what I am going to share applies to if you only used Annie’s Clear Wax. NOT if you used the Dark Wax. (that is because the Dark Wax has a stain in it and besides adding a layer of protection- you used the Dark Wax because the stain gives it an aesthetic effect. So, to start removing some after it has dried- you may lift partial amounts of stain and get a mottled / funny result.) So – with that said- I am focusing here on tacky Clear Wax.:

First- I would like to direct you to watch my video on how I apply Clear Wax. If you have never watched- you should. Think about what you may have done differently than I, based on my instructions. Watch that video by clicking HERE.

So, if you have too much wax on your piece, first take a clean rag that has no residual wax on it from previous applications. Focus on that one area of your piece of furniture and rub it lightly for 20 seconds. Touch it. Has any of the tackiness disappeared? (I am hoping you said yes) Sometimes- that tackiness comes from not a thorough rub off. If this worked- you got lucky.
Clear wax

If however, the tackiness is still there…you most likely applied too much wax. All is not lost though. You learned something that you will not do again- I am sure. And- here are TWO options to remove the tackiness:

OPTION 1.
If the tackiness is minimal but you cannot stand it, consider applying a fresh coat of Clear Wax, based on how I instruct in my video noted above when it comes to removing the residual wax. That is because the fresh wax you apply will activate the top micro layer of the previous dried/tacky application. The critical part here – is when removing the excess do so as I instruct in the video. You should not have a tacky feeling when you glide your hand over the surface after wiping off the residual. A cool, slightly moist feeling is ok…but in general- you should be able to glide you hand smoothly. This fresh application should even it all out. (this is what I would do – assuming it is only CLEAR wax you used- not the dark)

NOTE- apply wax over the whole side or top…not just spot treat. But you do not need to wax the whole piece of furniture if you are having this issue only on the top.

OPTION 2.

So, the next step is to try a rag with a little odorless mineral spirits on it and wipe off some of that wax build up.

Your rag should be damp only, not dripping! I like to use “real” Mineral Spirits..meaning not the “green” Mineral Spirits that has a milky white appearance. I just don’t feel it works nearly as well as the original Mineral Spirits. Take your rag and place it on the opening of the Mineral Spirits. Flip the container a couple of times in different areas of the rag. (the image I want you to think of is how a person would put nailpolish remover onto a cotton swab or ball!) With a tiny bit of Mineral Spirits on your rag, rub the piece in the direction you applied the wax. (Meaning- do not going against the grain) This is particularly important with Dark Wax and where you applied it in strokes. The mineral spirits on the rag will remove some of the wax – but it won’t restore the piece as it was before you applied all of the Wax. You do not want to be aggressively scrubbing in any one spot- you want to have uniformed removal of the build up.

After using Mineral Spirits- give your piece time to “air dry”…meaning allow the residual mineral spirits that may still be slightly on the piece to evaporate. Once the piece has no moisture to it, you can consider sanding some of the wax off. This can take a bit of time and be messy if the wax is on really thick. If after the Mineral Spirits step- your piece feels better…skip the sanding.

Keep in mind- that if you do not like the look of it after this “corrective measures- with chalk paint, you can paint right over the wax and start again. However, if you just know that there is still quite a bit of fresh wax on the piece, Annie has recommended you give the wax ample time to cure. This could mean waiting about 4 weeks. Once you go to paint over the wax- there is no extra prep work needed. Just make sure the Wax has dried! You cannot repaint over freshly applied wax…clear or dark! That is like walking on quick sand- ..not a good thing.

But let’s help you avoid this issue! Please read the following before using wax for the first time.

Wax seems to cause the most confusion for customers… So, I hope the following is helpful for you!:

How Much Wax Do I apply? If all you take away from what I say and do is this…you will be ok! So, please take note … we are not icing a cake! We are waxing furniture. So, VERY THIN & UNIFORM coats are best.

Just like when you put moisturizer on your skin- you do not put a thick coat on, but rather a THIN coat and rub it in- so that it will be absorbed into your skin. OR when you use hair conditioner…you apply it and then do what? Rinse it off. That is because your hair will absorb what it needs. Annie’s Chalk Paint will do the same thing in regards to the wax! And you should never have so much wax on your brush that it is “caked” up the sides. If you have this- you are using too much wax and more importantly- wasting your wax.

Also- you never apply the wax and then leave it that way- YOU ALWAYS REMOVE THE RESIDUAL and wipe off the extra. Never- ever apply wax and leave it for hours or days before doing this!!!!! NEVER!

CLEAR WAX- this is how The Purple Painted Lady uses it:
1. I take a plastic spoon and a paper plate. Using the backside of the spoon- I take a good amount of wax out of the tin and put it on the paper plate. (Place the cover back on the tin of wax until you need more)
2. I use my wax brush and pull some of the wax from the glob (for lack of better words.) Only the tips of your wax brush bristles should have wax on them- there should not be wax covering up the side of the brush. A little goes a long way! Again- you are not icing a cake where you want a generous amount of thickness. We are applying the wax very thin- pressing uniformly with steady pressure- but not so much that you are bending the bristles on the wax brush. I like to use the analogy that this is similar to waxing your car…you apply the wax- BUT NOT SO MUCH that when it is time to wipe it off or buff- you need a power tool to do it! So- apply a thin layer of wax and GET IT IN THE GROOVES OF THE PAINT. Again- another analogy is a Thomas’s English Muffin. Think if the wax being butter. You want the butter to get into all the nooks & crannies. Same concept for the wax in regards to the paint.
3. APPLY WAX IN SECTIONS: I work in about 1 foot sections … I use a circular motion when applying the Clear Wax. Sometimes- depending on the piece- (except when going for that Rustic look or when you have a textured piece) I will apply the wax in the same direction as my painted brush strokes. Either way…circular or not….when I have finished waxing a whole side of the piece – I ALWAYS finish with a few clean straight wipes with my rag in the direction I painted and I am pushing the wax in and wiping off the extra. If I was doing a dresser top- I would start at the back reaching across while standing in front of the piece and as I apply the Annie Sloan wax – I work my way toward the front as so I don’t lean into a previously waxed area. You will see where you waxed prior because it does deepen the hue of the paint a slight amount but be aware of where you just waxed. I also overlap my waxing sections so I ensure that I do not leave any missed spots. 4. WIPE OFF WAX: After applying the wax to one section, I will notice when the wax is not covering as much- that is my queue I need more wax. But before reloading your wax brush….use a lint free cotton t-shirt (an old one from my husband or an old sheet) and I wipe off the residual wax with a couple wipes ..circular or in the same direction as I just waxed. (I am not buffing the wax at this stage! Merely just removing or incorporating any small wax “crumbs” that may be present.) Again- a few uniformed swipes or circular rubbing (but more if necessary) – and that is it. 5. Resume waxing the next area- I wax strategically – meaning in an organized direction so I do not miss a spot. And I overlap my last “section” just a smidge so I don’t miss any of the surface.
6. The wax will dry (meaning no longer be tacky to the touch within a short time….maybe an hour or two?) However a variable in the dry time is the temperature and humidity where you are located. Is it is humid and cooler- cure time will be longer. If it is taking a long time and your wax is still tacky and you are not in the rain forest- reread my warnings above regarding applying the wax thin!
Depending on the piece I am finishing- I may have different amounts of wax coats. For instance…..a dresser. I may have 2 – 3 coats of wax on the top, but only 1 coat of wax on the sides and front.
7. Once the piece is no longer tacky- if you want to have a shinier finish- buff your piece. If you like it as is- then you are done! It does not take much rubbing and the piece will be quite shiny- so pay attention and have good lighting so that you do not over do it.
8. Remember NO WAX when painting pieces for outside.

“Do not “touch up” areas with paint once waxed- you either need to do the whole surface or don’t do it at all. Even if you rewax- spot painting always shows in certain lighting.

9. Surfaces that will get serious use (wear and tear) like tops of dressers and tables – should receive 2 to 3 coats of wax. If you are using Dark Wax, apply your clear wax coats first and let it thoroughly dry before doing a top layer of dark Wax! Follow the procedure above – always allow wax to dry between additional coats.

Please watch my wax video! Visit my VIDEOS Page here to do so!