This may be a “TMI” blog post……but I turned 50 a little over a week ago. Yep, I did …and there….. I said it! LOL I think whenever each of us is blessed to graduate from one decade to the next it brings a range of emotion. Hopefully all are good, but for me …there is always a little tinge of a melancholy – emotional farewell.
I remember when I became a teenager…I was sad because it meant I was no longer a “kid.” Here I am today and feel anyone younger than 40 is just a “kid.” I guess it is all in your perspective and I will probably feel anyone who is 50 is just a kid, if I hopefully make it to 70 or 80…or heck….90!
My last year, being 49 was a great year for me in all senses, professionally and personally. I accomplished some very cool goals with my business, managed a bunch of overwhelming tasks that truthfully, I think some would have crumbled under the pressure and personally, focused on my health and close relationships.
My dad passed away from cancer a week and half before my 12th birthday in 1982. He was only 47. He was a wonderful man and every year on my birthday…of course, I think about him. But breaking past the milestone of 47 meant alot to me. But there was something about turning 50 with the goal to have lower cholesterol and blood pressure that was super important to me. Many have never struggled with their health and that is a blessing for them!
For me…it was not quite a straight path but I am really proud to say, that I did it! I saw this sign that says, “Success is never owned. It is only rented, and the rent is due every day.” This is true for all aspects of life or any goal you might have in business, relationships and health. I would like to think I pay a little rent every day with the choices I have made and continue to make and my daily decisions. It is not always easy, but nothing worthwhile ever is.
And although this post is not related to paint, or a “how to”….I do feel that “The Purple Painted Lady” is little more than a paint resource to many people and even if we have not met face to face…..we are friends. So, here is just glimpse into one of the millions of thoughts bouncing around in my head at any one minute. LOL
If you are reading this…I just want to thank you for being part of the extended Purple Painted Lady Family!
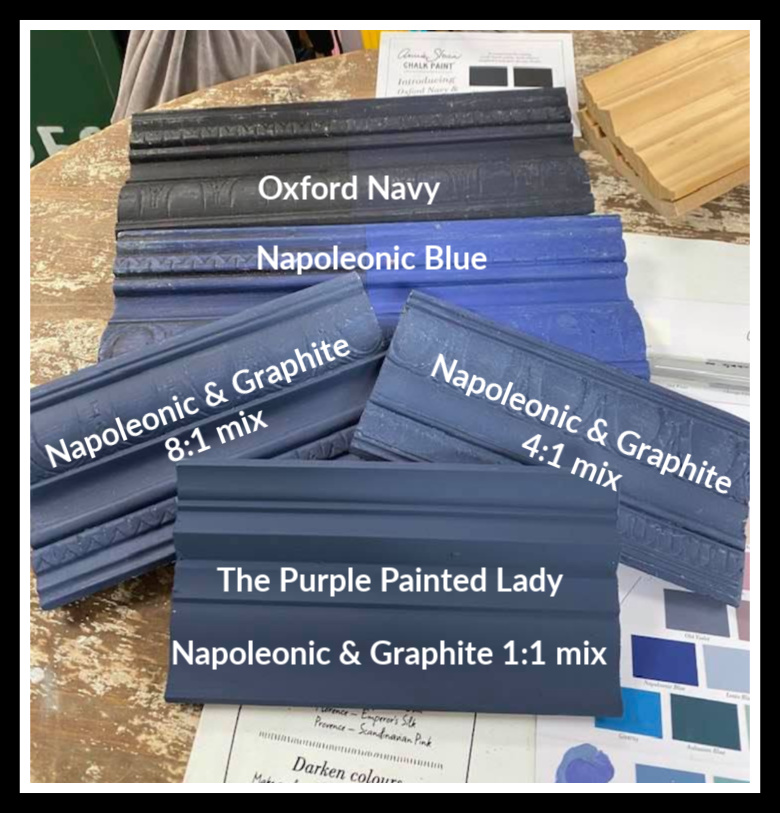
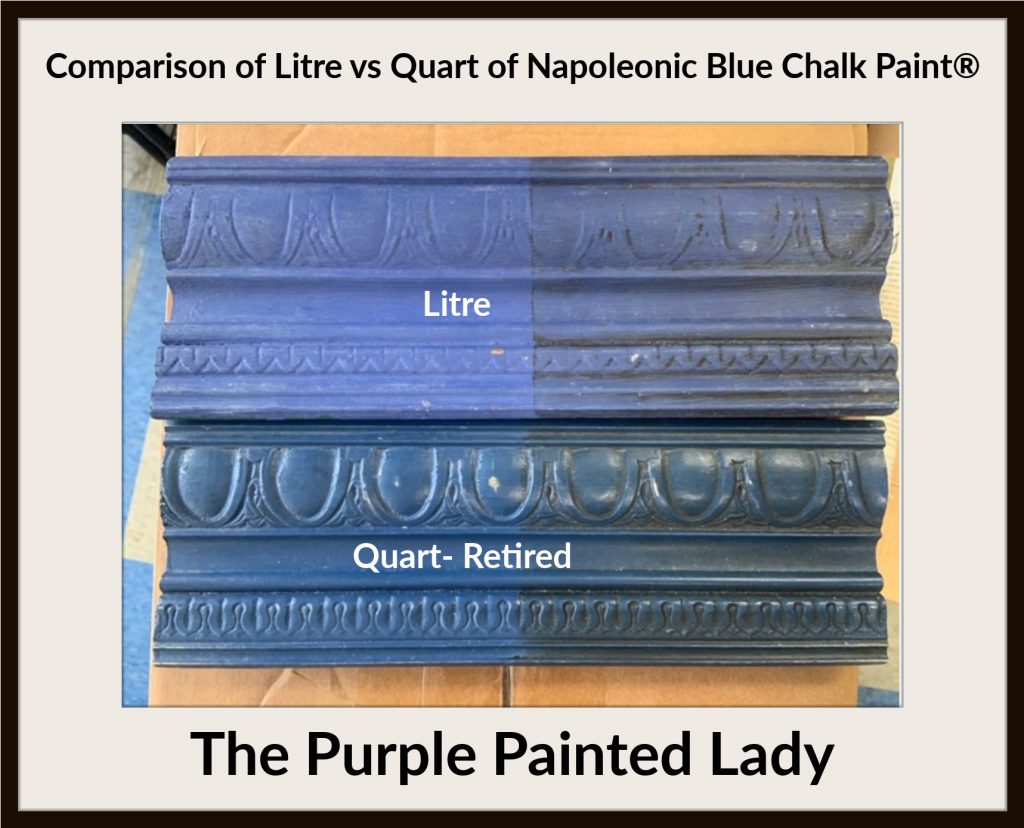
NAPOLEONIC BLUE QUART VS LITRE PACKAGING COLOR DIFFERENCE:
Annie Sloan sells her Chalk Paint® in over 60 countries. At the end of 2018 and into early 2019, in order to get us in line with all of her other countries and her pigments, she took back manufacturing and distribution for Canada and the USA. We were the only countries that had some slight differences in pigments and packaging. Below is a photo showing sample boards of Napoleonic Blue painted from the retired Quart packaging to the now, 2019 and after Litre packaging. NOTE that due to the Global Transitioning of paint- this color has changed! It is more of a cone flower blue. It is different than what was ordered in the past. (see image below) Napoleonic Blue is a NOT Navy by itself! I feel it is more of a cone flower blue….almost with hints of Periwinkle to it! A deep true blue that is the color of fresh picked blueberries- perfect for creating the Union Jack flag! Napoleonic Blue is inspired by the ultramarine and cobalt blue pigments used for decorative work in everything from neoclassical interiors through to modern 20th-century decoration. See our video on the shift in color HERE.
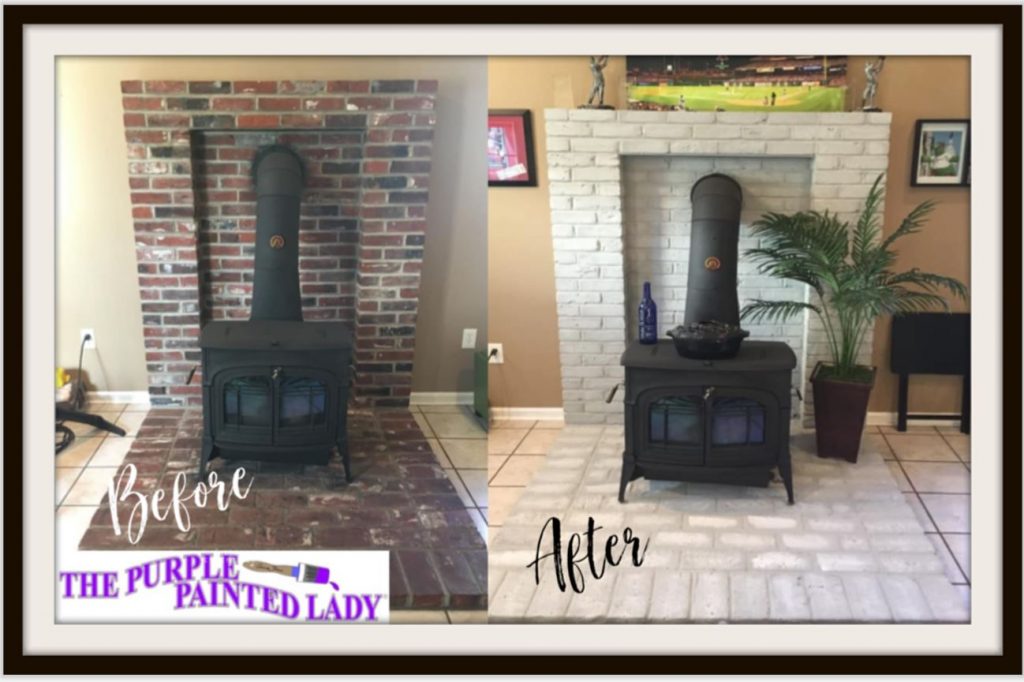
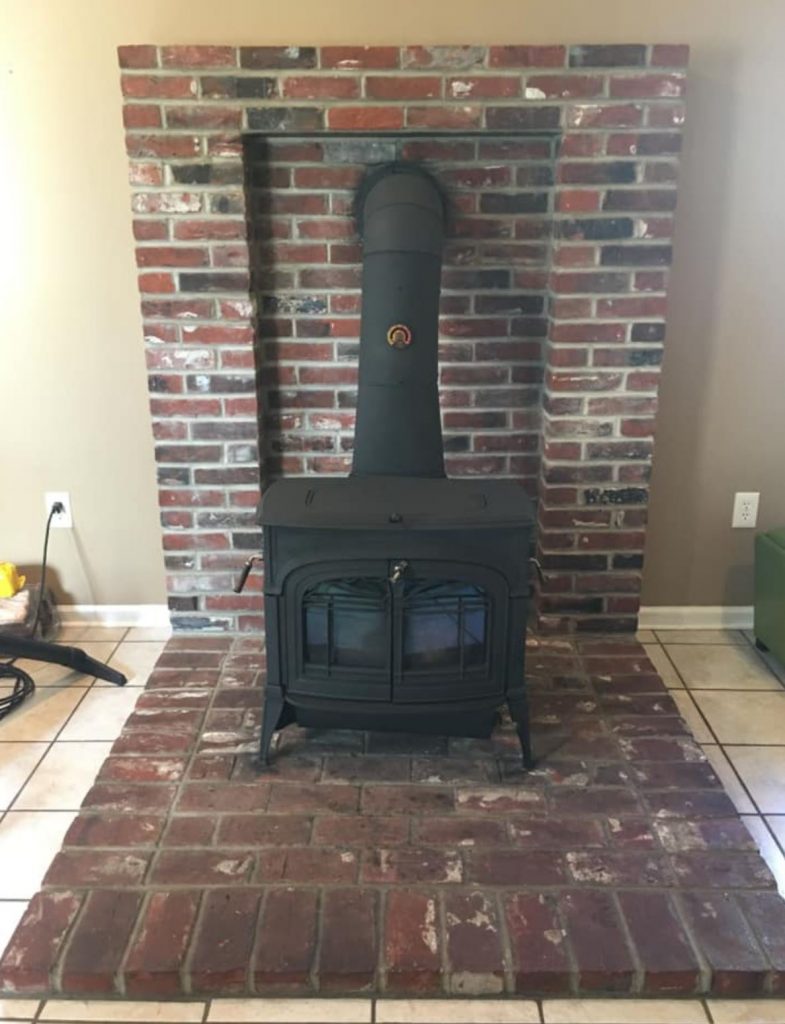
Chalk Paint®️ by Annie Sloan helped Andrew transform an area of his home that he did not like. He was over the traditional red brick and wanted to lighten up the space so he used Paris Grey Chalk Paint® by Annie Sloan all over and then the color called Pure (white) on random bricks to break up the solid color of Paris Grey. Take a peek at this before and after of the brick surrounding his wood burning stove.
Crazy transformation, huh?
STEP 1. CLEAN:
Andrew used swept and vacuumed his brick surround to remove any dust and debris first. Depending on how dirty your brick surround is – will dictate to what degree you will need to clean it. Also, depending on how shiny your bricks are – which means, if they had been sealed prior or if they are a flat, and unsealed….. On shiny bricks, soot will not stain as easily and usually comes off sealed brick with just soap and water. Use caution with using stronger cleaners on sealed brick to avoid stripping off the oil sealer. Brick that has a dull, flat appearance is unsealed brick and that is harder to clean because soot, dirt and grime can penetrate easily into cracks and crevasses.
One suggestion for cleaning bricks, is: Put 4 cups of hot water in a spray bottle. Add 1/2 cup of Ammonia and 1/4 cup dishwashing liquid and swirl to mix. Spray a section of bricks with the cleaning solution. Scrub each brick with the nylon bristle brush. … If the bricks are especially dirty, you may need to apply more pressure.
MAKE SURE TO ALLOW FOR A COUPLE DAYS FOR THE WET BRICKS to thoroughly dry if using a cleaning agent.
STEP 2. PAINT:
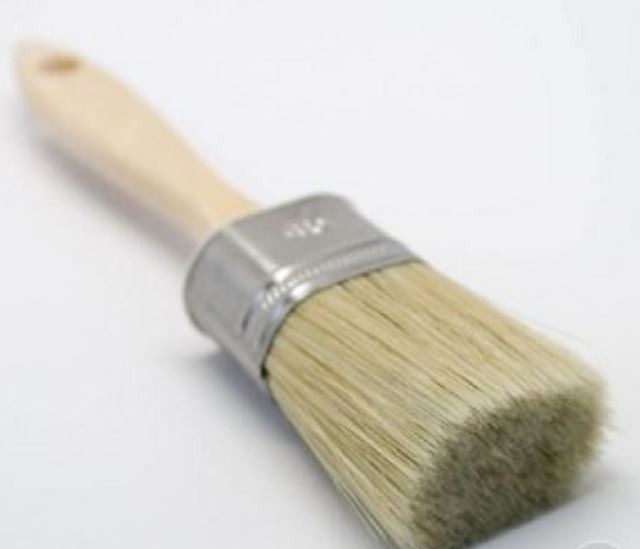
Andrew used Paris Grey Chalk Paint®️ by Annie Sloan and an Annie Sloan Small Dome Top Paint Brush – and painted all over the brick surround. This paint brush is wonderful for this type of application because the large head of the bristles, are able to work like a mop and really get into the nooks and crannies of the brick and grout lines.
Keep in mind, some brick may be thirstier than others and will really suck up the paint. Depending on how opaque of a look you are going for, you may need more than once coat.
Then, Andrew took his Pure Chalk Paint® and thinned some of it by adding a little water to small amount to thin it and then selectively chose specific bricks to lighten to get more subtle effect. This allowed for the look to be more interesting versus being all Paris Grey.
NO TOP COAT is needed, but if you want to apply a top coat, we strongly suggest that you check with your local fire marshall because every city and state have different restrictions and requirements.
So, what do you think? We love it! And if you want to see more fireplace and mantle transformations. LOOK AT THIS WEB POST HERE! : )
No photos to show on this, but wanted to share some information on if can you paint Chalk Paint® over wallpaper?
Yes, you can use Chalk Paint® over wallpaper BUT……..
9Again)……But…….. the most important factor to consider though was if your wallpaper was sized properly when it was first hung. You would not want to paint the wallpaper- have the chalk paint moisten it and then have the wallpaper fall off the wall.
So, if you want to paint wallpaper- I would also recommend that you apply one or two coats of Shieldz Wallpaper Primer first. The Shieldz Wallpaper Primer will act as a moisture barrier so that the wallpaper does not become saturated and loose by the Chalk Paint®. It will also block any inks used to print the wallpaper from bleeding through into the new paint layers.
I would STRONGLY suggest doing a “test” area in the most inconspicuous spot in the room because we cannot guarantee that this will not cause an issue with your wallpaper (that is a disclaimer in case we were subtle). And then — be prepared for if it does not work – to take on the project of stripping the wallpaper! I get that removing wall paper is not fun. In fact- if it was not put up properly- removing it can even ruin your drywall….but in the end, you may have to bite the bullet.
Lastly, always ask yourself if what you are doing could impact the resale value of your home if you were going to sell it. : )
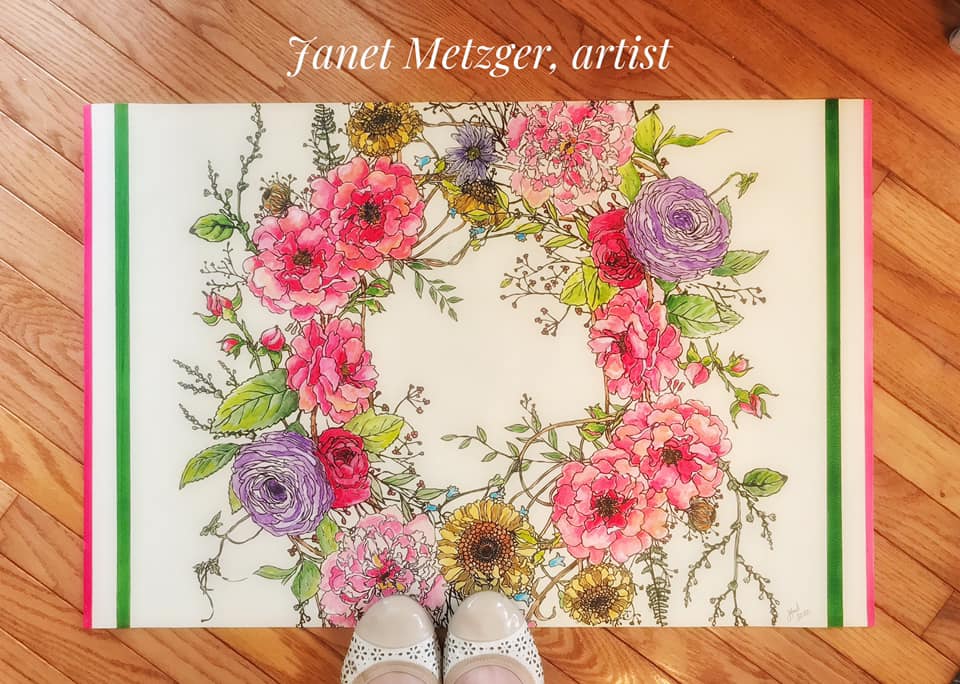
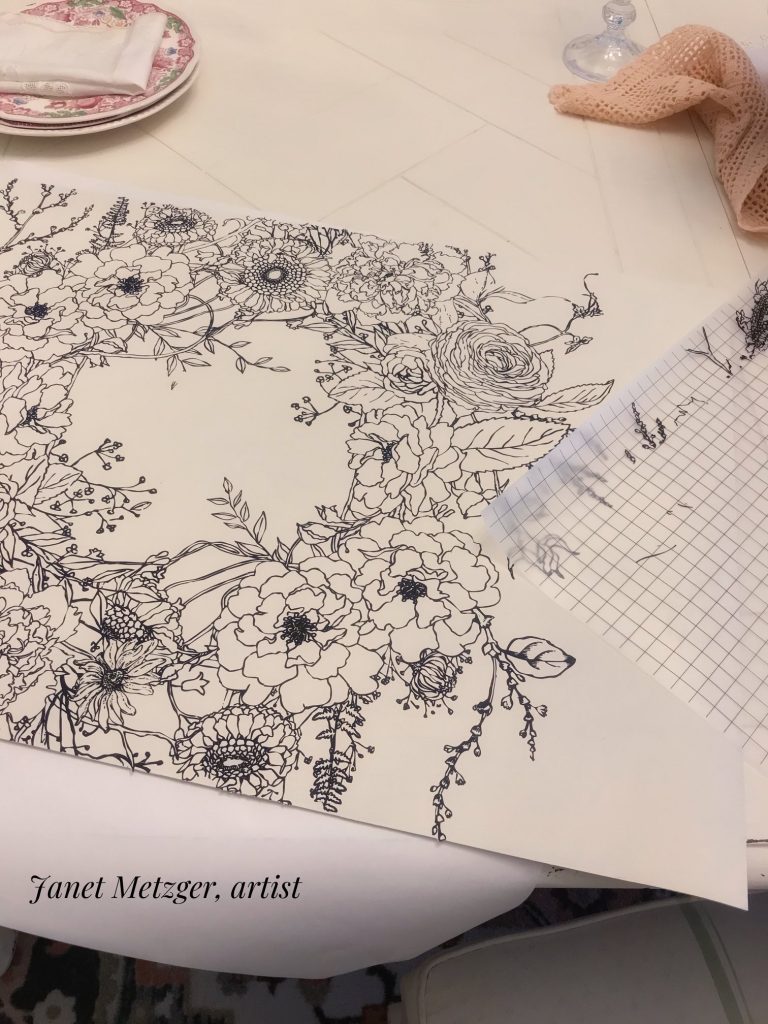
Janet is going to break this all down for you in easy steps you will want to do yourself.
PAINT YOUR BASE COAT:
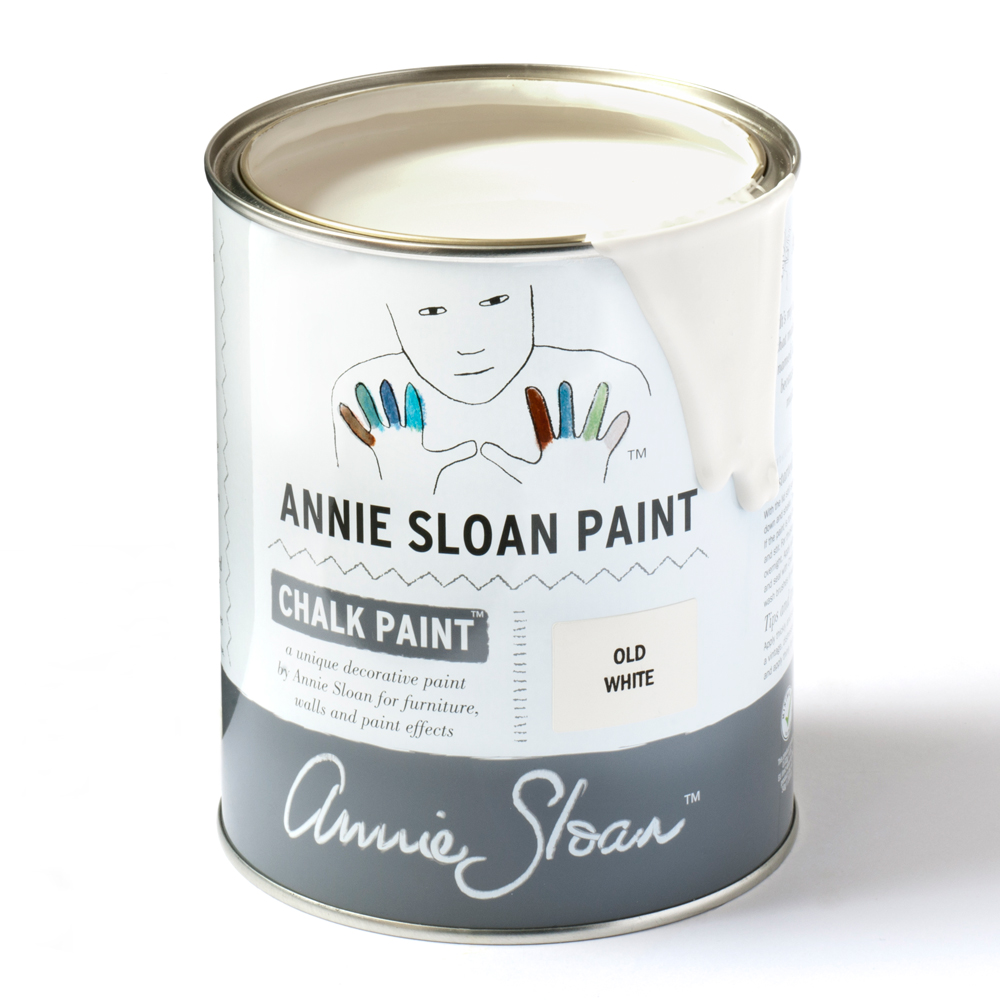
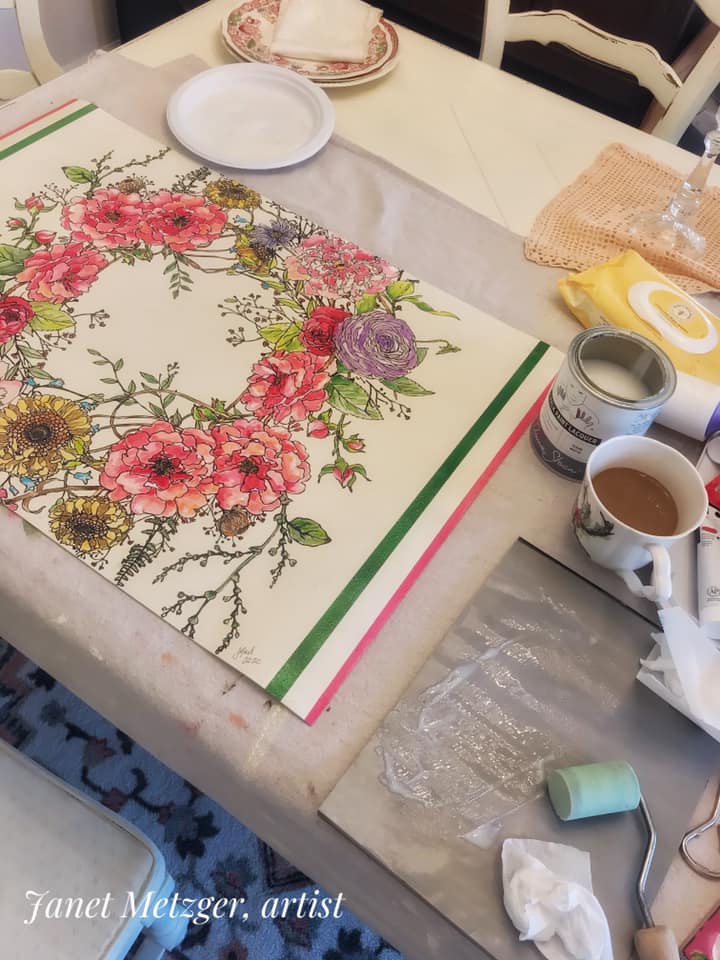
First, using a piece of vinyl floor covering, (pick up a remnant at your local linoleum store or big box store…you often can get them for free) Janet base coated the mat with Annie Sloan’s Old White Chalk Paint®. She applied two coats of it.
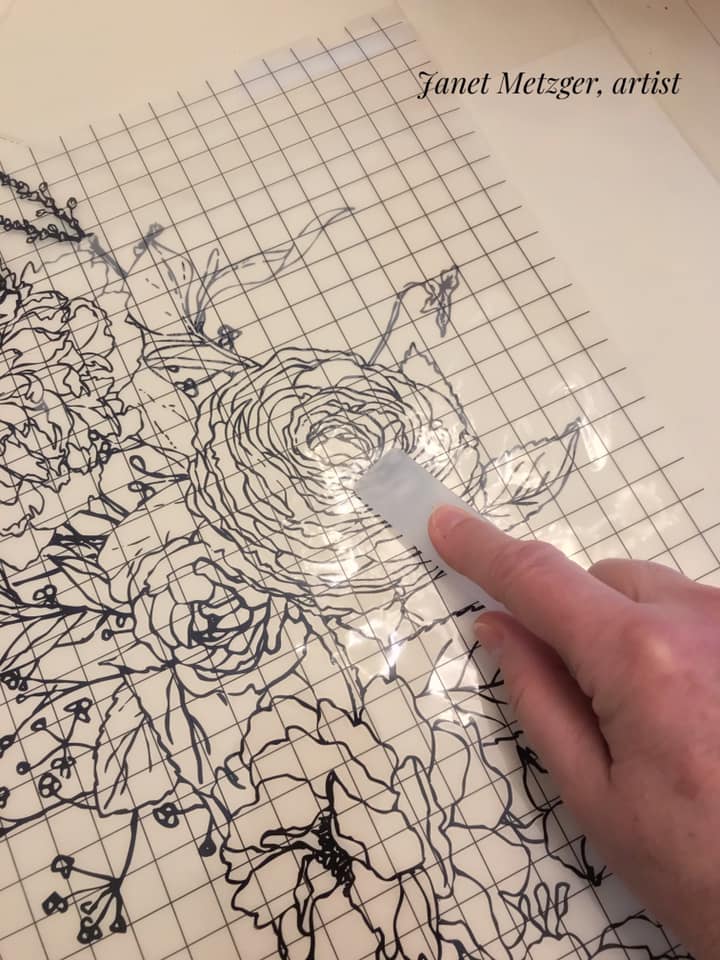
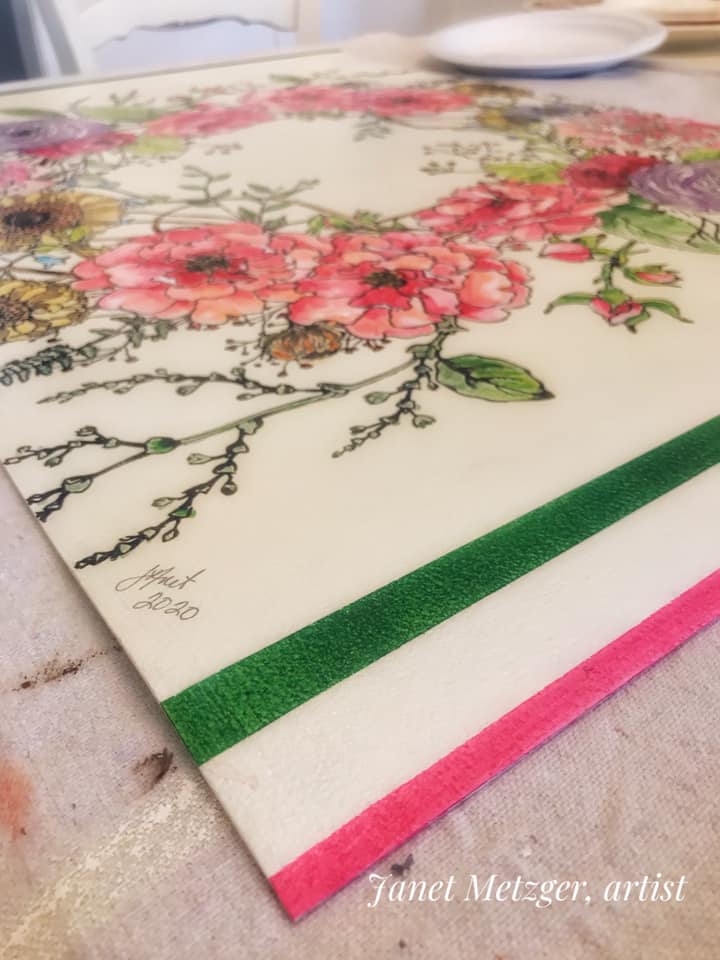
APPLYING THE TRANSFER:
After letting that dry overnight and the paint has begun to cure, she then placed the Iron Orchid Design’s Transfer called Winter’s Song Wreath on to her painted floor cloth. Using the tool that comes with the transfer, using a rubbing motion, she transferred the design onto the painted floor cloth. Notice how the acetate that the transfer is packaged on for safe keeping has a grid pattern on it. The grid pattern will not transfer, but it is there as a tool to help you align the transfer for placement better.
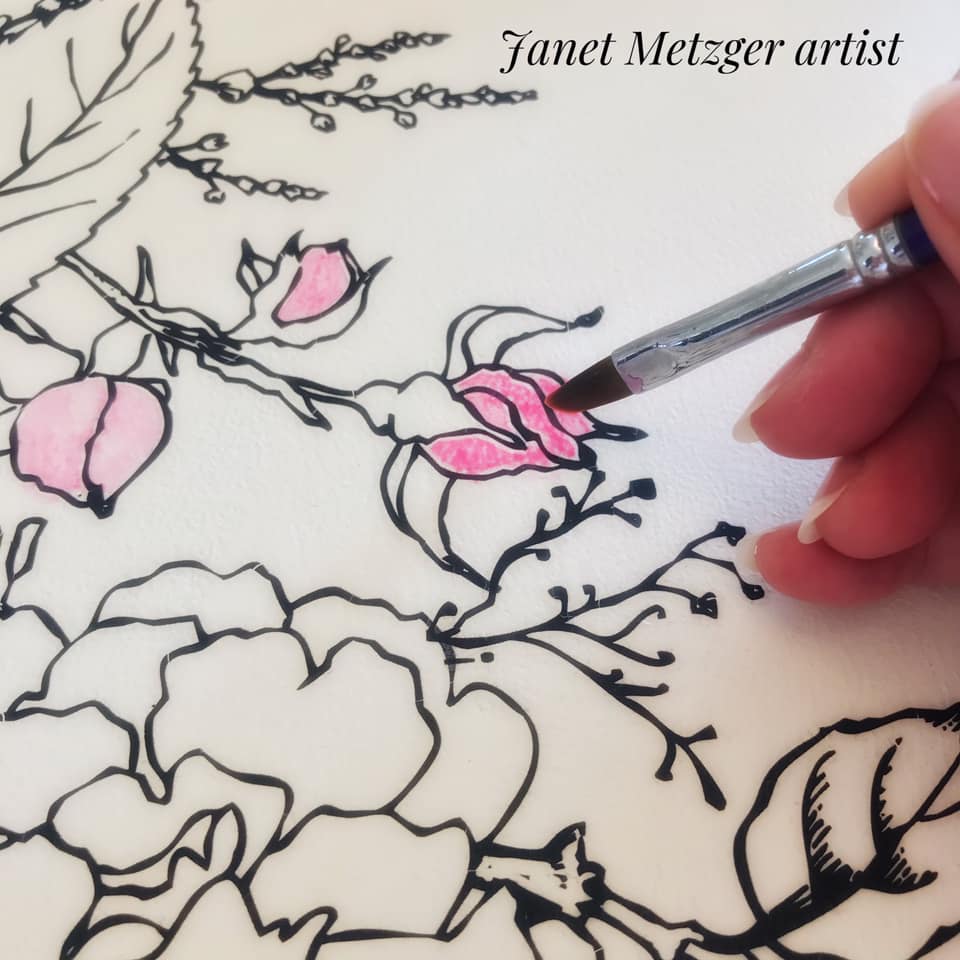
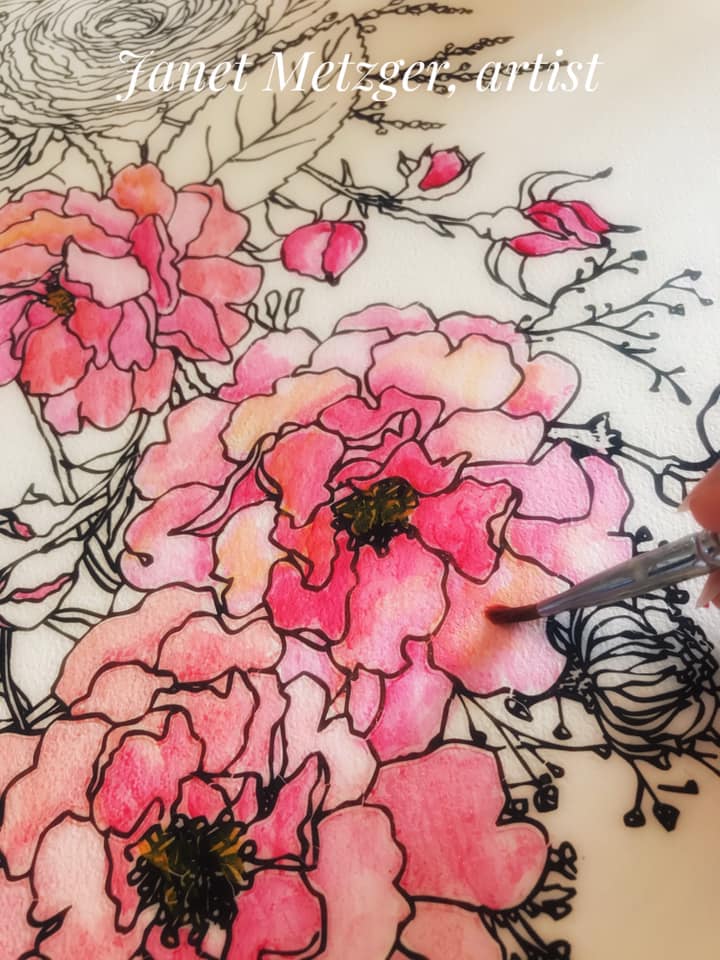
Janet started lightly with washes and slowly built up from there. She wanted to give the flowers depth and a three-dimensional appearance. She used acrylics on her floor cloth, but she has used Chalk Paint® before and it worked fine. <the only difficulty when using Chalk Paint® is that it dries so fast, you will definitely want to add water to thin it out so it acts like a watercolor paint> Otherwise, it won’t give you enough time to play with shading and highlighting.
For some added design and interest, she painted green and pink stripes on the edges. You can tape off your stripes or just paint them freehand. It’s personal preference at this point. She let all of her color dry and start to cure overnight.
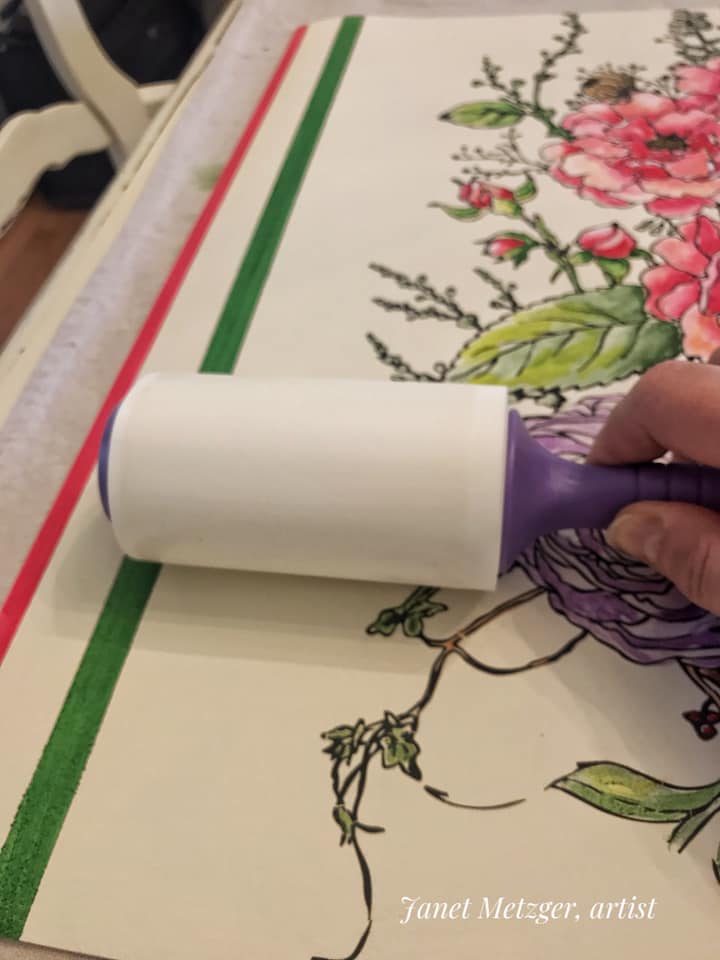
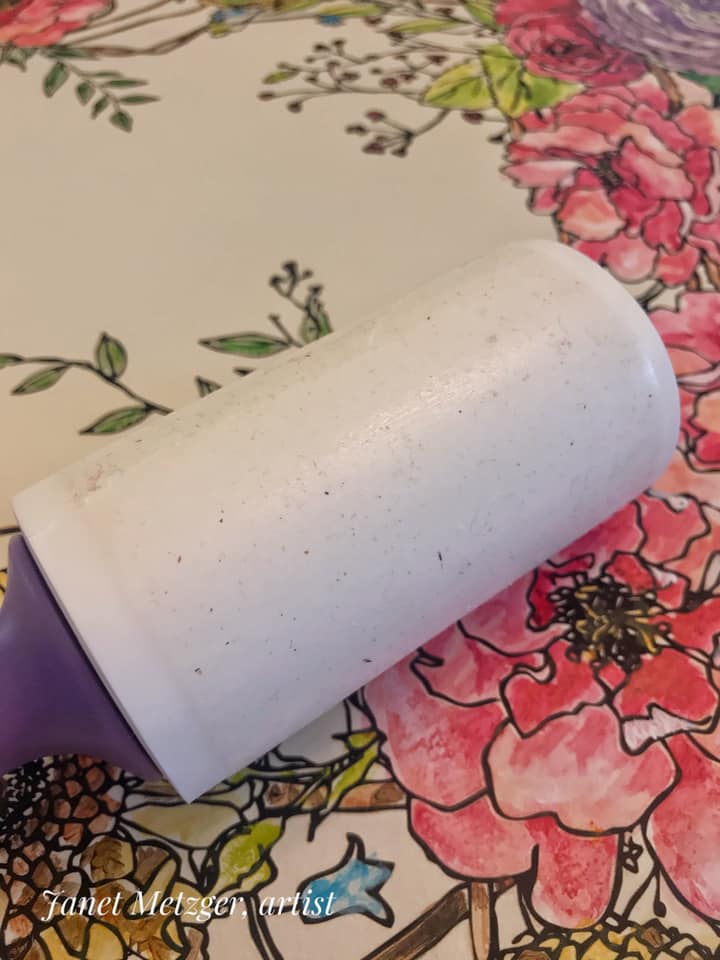
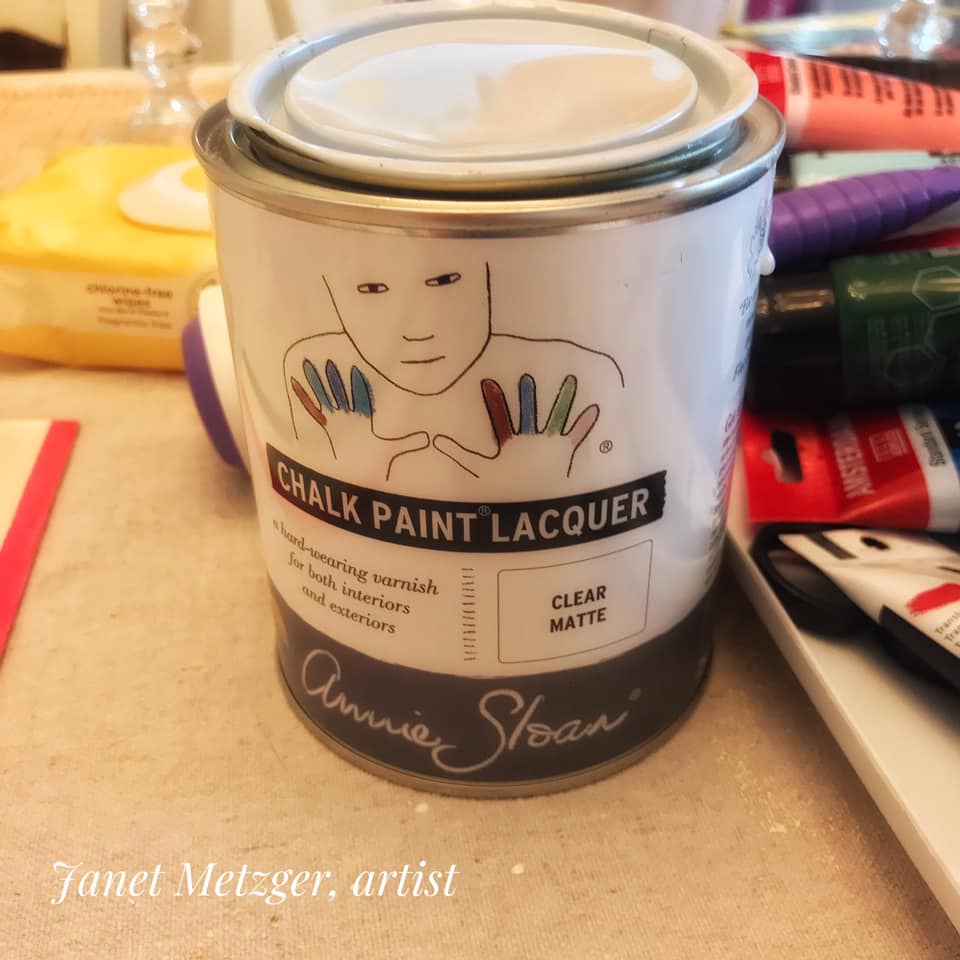
DUST OFF THE SURFACE BEFORE APPLYING THE LACQUER:
After letting all the color set overnight, prior to applying her topcoat, Janet used a sticky lint roller to remove any dust or dirt particles on the surface of her floor cloth. This is a very important step, because you don’t want any of that debris in your final varnish coats. You will be surprised and can see in the photos that even though an hour prior Janet had cleaned it, by the time she was ready to varnish, there was more debris. If you choose to use a brush, she would recommend a good varnish brush with some softness to it. You do not want a stiff brush that will drag on your surface. That will leave brush marks.
APPLY THE LACQUER TO PROTECT YOUR PAINT AND TRANSFER:
Now she has a pretty work of art for her floor!! What I love about these transfers and stamps offered by the IOD sisters, Sally and Josie Celio Iron Orchid is that even if you are not an artist and can only draw stick figures, you can still create beautiful florals and other designs for your home decor or your business.
PS…Because I know you guys will ask, yes vinyl and canvas floorcloths are extremely durable and clean up with a damp rag and water. When I owned a shop, I had quite a few on the floor that got walked on daily for five years. They held up beautifully.
And, If your piece of vinyl is not non skid, then you can use the unique double sided tape they sell for this purpose. This is one example.
Another point….vinyl and canvas floorcloths are NOT to be used on top of carpet.
Trish always shares, “first- if you have a local stockist- go visit them and build a relationship with them. Go to them with your questions and project issues.” BUT- if you do not have a local stockist- we invite you to try our customer service!As for buying any of the products we mentioned earlier in this post- I hope that you select The Purple Painted Lady® to be your one stop resource! We have two locations in western NY. Check out our Information tab and come and meet us! Otherwise- if you are not located near me- the following information may apply to you. This information is directed to those who do NOT have a local stockist. Because if you do – go and meet them, shop from them and build a relationship with them. The guidance, information and knowledge they share with you – will be invaluable. Get inspired by their shop that they lovingly curated – just for you! Enjoy that one on one experience! But for those who are in a location where there is no one selling paint products- and you must buy on-line- consider us. With that said, visit www.anniesloan.com to find a stockist near you. We are here to help you, our customers! We want you to be successful!
SOME OF THE REASONS WE THINK THE PURPLE PAINTED LADY® CUSTOMER SERVICE IS THE BEST: * We love our customers and it shows!* Ordering online? If you order before 3 pm EASTERN TIME any day Monday thru Friday – we will ship out your package that SAME day either via USPS or UPS. We ship orders out every since week day all over the US. (THIS IS DIFFERENT than SAME DAY DELIVERY. We do not offer that)* We offer low flat rate shipping cost so if you are one town away or 10 states away- the shipping cost is the same.* We have awesome follow up customer service, too!*
SHOP ONLINE HERE : ) And I will be here to help you as you progress through your future project! And if I do say so myself- we offer the BEST customer service that you will ever experience! Lastly- if I was helpful to you- ….please consider leaving a positive review on my Facebook business page sharing your positive experience or thoughts about The Purple Painted Lady®. Here is a link to my Facebook page=> http://www.facebook.com/pages/The-Purple-Painted-Lady/291882785710 This really helps me! (wink, wink!) XO~Trish